user-guides
Keycloak ↔ Microsoft Entra (Azure AD) Federation for Power BI — Complete Guide
Purpose: Step‑by‑step guide to federate a Microsoft Entra tenant (Azure AD) with Keycloak so users authenticated by Keycloak can access Power BI (Microsoft 365). This guide explains why SAML is required, prerequisites, exact configuration steps (PowerShell + Keycloak), mapper examples, testing checklist, troubleshooting, and references.
Table of Contents
- Purpose & Summary
- Architecture Diagram
- Key Concepts: SAML vs OIDC (short)
- Prerequisites
- High-level Flow
- Step-by-step: Configure Keycloak as SAML IdP for Entra
- Create SAML client in Keycloak
- Mappers
- Export metadata / certificate
- Step-by-step: Configure Entra (Azure AD) to trust Keycloak
- PowerShell (MSOnline) script
- Notes for AzureAD / Microsoft Graph variant
- User provisioning: JIT vs SCIM vs Pre-provision
- Testing checklist
- Troubleshooting
- Security & Operational Notes
- References & Public Docs
1. Purpose & Summary
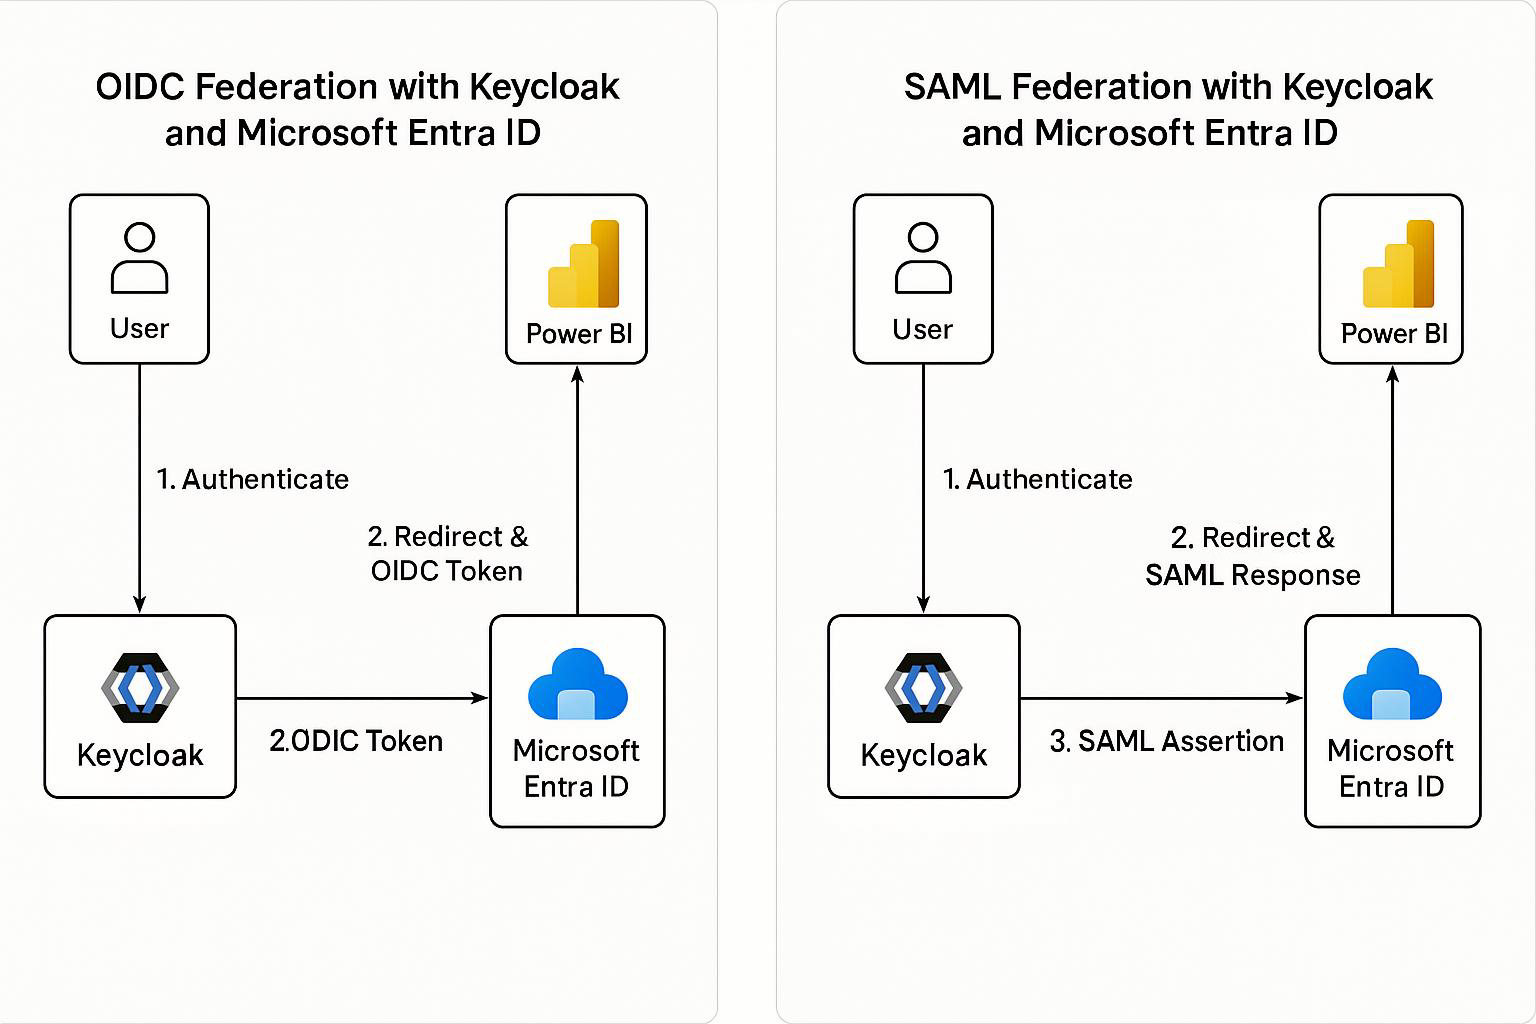
Power BI and the Microsoft 365 ecosystem rely on Microsoft Entra (Azure AD) for authentication. You cannot point Power BI directly to Keycloak. Instead, you configure domain-level federation in Entra so that when a user signs into Power BI with user@yourcompany.com, Entra redirects authentication to Keycloak (SAML). After successful authentication Keycloak returns a SAML assertion to Entra, Entra issues tokens for Power BI.
Bottom line: For Power BI → Entra → Keycloak federation, use SAML (SAML 2.0). OIDC is not supported for tenant-level Microsoft 365 sign-ins.
2. Architecture Diagram
3. Key Concepts: SAML vs OIDC (short)
- Security Assertion Markup Language(SAML) 2.0: XML-based assertions, standard for enterprise SSO and federation with Microsoft 365. Suitable for tenant-level federation in Entra.
- Access OpenID Connect (OIDC): JSON/JWT-based, built on OAuth 2.0. Great for modern apps, APIs, SPAs, and for External Identities (B2C/B2B scenarios) but not for tenant-level federation used by Microsoft 365 apps.
Conclusion: Use SAML for the scenario in this guide.
4. Prerequisites
- Admin access to the Microsoft Entra tenant.
- Admin access to Keycloak (recommend v20+).
- Verified custom domain in Entra (e.g.,
yourcompany.com). - Keycloak realm for the tenant and a realm signing certificate (X.509) exported.
- Power BI licenses available/assignable for users.
- PowerShell access to run
Connect-MsolService/MSOnline (or Microsoft Graph alternative).
5. High-level Flow
- User opens Power BI and enters
user@yourcompany.com. - Power BI redirects user to Entra for authentication.
- Entra recognizes the domain as federated and redirects to Keycloak (SAML SSO).
- User authenticates at Keycloak; Keycloak returns a SAML assertion to Entra.
- Entra issues a token for Power BI and the user gains access.
6. Step-by-step: Configure Keycloak as SAML IdP for Entra
Option A — Use Keycloak Admin Console (recommended)
- Create a SAML client in the Keycloak realm.
- In Keycloak Admin Console → Realm → Clients → Create.
- Client ID:
urn:federation:MicrosoftOnline(or a name you choose — the important part is consistent with metadata). - Client Protocol:
saml - Root URL / Valid Redirect URIs / Assertion Consumer Service (ACS): Add Entra ACS
https://login.microsoftonline.com/<TENANT_ID>/saml2
- Name ID Format:
email - Sign Assertions: ON
- Force POST Binding: ON (optional but recommended)
- Configure client Settings
- Ensure Sign Assertions is enabled and Keycloak uses the realm signing key for SAML signing.
- Set Signature Algorithm if required by tenant policies.
- Create Protocol Mappers (important)
email- Mapper Type: User Property
- Property:
email - SAML Attribute Name:
http://schemas.xmlsoap.org/ws/2005/05/identity/claims/emailaddress(or simplyemail)
givenName- Property:
firstName - SAML Attribute Name:
givenname
- Property:
surname- Property:
lastName - SAML Attribute Name:
surname
- Property:
- (Optional)
groupsorrolesif you need group/role claims passed to Entra.
- Export Keycloak Metadata & Certificate
- Client → Installation → select SAML Metadata IDPSSODescriptor or saml20-idp-redirect-binding.xml and download.
- Export the realm signing public certificate (X.509) and save as
.cer— Entra needs the certificate to validate signatures.
Option B — Import SAML metadata XML
You can craft an EntityDescriptor XML with correct endpoints and X.509 certificate. Example snippet is provided later in the doc.
7. Step-by-step: Configure Entra (Azure AD) to trust Keycloak
Approach 1 — MSOnline PowerShell (classic) — ready to run
Important: Replace placeholders (
<...>) before running. This example uses the MSOnline module andSet-MsolDomainAuthentication.
# Install & connect (run as admin)
Install-Module -Name MSOnline -Force
Connect-MsolService

# Variables - REPLACE these
$domainName      = "yourcompany.com"
$keycloakHost    = "auth.kc.example.com"          # no trailing slash
$realm           = "yourrealm"
$federationName  = "KeycloakFederation"
$signingCertPath = "C:\temp\keycloak-signing.cer" # Exported X.509 public cert

# Read certificate into Base64 string
$certBytes = [System.IO.File]::ReadAllBytes($signingCertPath)
$base64Cert = [System.Convert]::ToBase64String($certBytes)

# Passive / Active login URIs (SAML endpoints in Keycloak)
$passiveLogOnUri = "https://$keycloakHost/realms/$realm/protocol/saml"
$activeLogOnUri  = "https://$keycloakHost/realms/$realm/protocol/saml"
$issuerUri       = "https://$keycloakHost/realms/$realm"
$logOffUri       = "https://$keycloakHost/realms/$realm/protocol/saml/logout"

# Apply federation to domain
Set-MsolDomainAuthentication `
  -DomainName $domainName `
  -FederationBrandName $federationName `
  -Authentication Federated `
  -PassiveLogOnUri $passiveLogOnUri `
  -ActiveLogOnUri $activeLogOnUri `
  -IssuerUri $issuerUri `
  -LogOffUri $logOffUri `
  -SigningCertificate $base64Cert

# Verify
Get-MsolDomainFederationSettings -DomainName $domainName | Format-List
Notes:
- If your tenant blocks
Set-MsolDomainAuthentication, or your organization prefers modern modules, use the Microsoft Graph PowerShell or the AzureAD module. I can provide an equivalent script on request. PassiveLogOnUriandActiveLogOnUriare typically the same Keycloak SAML endpoint.
Approach 2 — Entra Admin Center (UI)
- Go to Entra Admin Center → Identity → External Identities → All identity providers → + New SAML/WS-Fed IdP.
- Use the Metadata file exported from Keycloak or provide the Metadata URL (Keycloak realm metadata URL is
https://<KEYCLOAK_HOST>/realms/<REALM_NAME>/protocol/saml/descriptor). - Fill in display name, branding and upload the Keycloak signing certificate if required.
8. User provisioning: JIT vs SCIM vs Pre-provision
- Just‑in‑Time (JIT): Entra External Identities can create user accounts at first successful federation login (subject to your tenant settings). Good for minimal setup.
- SCIM: For long-term managed identities in Entra (if you want users to exist centrally), implement a SCIM connector to push users from Keycloak to Entra. This requires additional implementation.
- Pre-provision: Create users in Entra (bulk or script) with matching UPN/email prior to federation.
Choose based on lifecycle management and compliance requirements.
9. Testing checklist
- Verify Keycloak realm signing certificate is valid and exported.
- Verify DNS + domain ownership is validated in Entra for
yourcompany.com. - Run
Set-MsolDomainAuthenticationand verify withGet-MsolDomainFederationSettings. - Attempt login at
https://login.microsoftonline.comwithuser@yourcompany.com— expect redirect to Keycloak. - Confirm SAML response contains expected attributes:
email,givenname,surname. - Ensure the user is assigned a Power BI license in Entra.
- Test accessing
https://app.powerbi.comand confirm successful sign-in and access. - Test sign-out and Single Logout (SLO) if required.
10. Troubleshooting
- Assertion rejected: Check clock sync (NTP),
NotBefore/NotOnOrAfterwindows, and correctAudience/Issuervalues. - NameID mismatch: Ensure Keycloak NameID format =
emailand the value matches the Entra UPN. - Signature validation fails: The public certificate in Entra must match Keycloak’s signing cert. Re-export the public cert from Keycloak and re-upload.
- Redirect loops: Misconfigured ACS or issuer URIs. Verify
Issuerin SAML equals the value Entra expects. - Set-MsolDomainAuthentication errors: Use Microsoft Graph PowerShell equivalent or ensure you have sufficient tenant permissions.
11. Security & Operational Notes
- Protect the Keycloak realm signing private key; rotate certificates on a planned schedule.
- Monitor SAML login failures and user provisioning events.
- Consider conditional access policies in Entra (MFA, device compliance). Note: applying conditional access may affect federated flows; test carefully.
- Log and audit SSO events in both Entra (Sign-in logs) and Keycloak.
12. Example Keycloak SAML IdP Metadata (snippet)
Replace placeholders and insert your base64 X.509 certificate in the
<X509Certificate>node.
<EntityDescriptor entityID="https://auth.kc.example.com/realms/yourrealm" xmlns="urn:oasis:names:tc:SAML:2.0:metadata">
  <IDPSSODescriptor protocolSupportEnumeration="urn:oasis:names:tc:SAML:2.0:protocol">
    <KeyDescriptor use="signing">
      <KeyInfo xmlns="http://www.w3.org/2000/09/xmldsig#">
        <X509Data>
          <X509Certificate>
            MIID...base64 certificate...
          </X509Certificate>
        </X509Data>
      </KeyInfo>
    </KeyDescriptor>

    <SingleSignOnService Binding="urn:oasis:names:tc:SAML:2.0:bindings:HTTP-Redirect"
                         Location="https://auth.kc.example.com/realms/yourrealm/protocol/saml"/>
    <SingleSignOnService Binding="urn:oasis:names:tc:SAML:2.0:bindings:HTTP-POST"
                         Location="https://auth.kc.example.com/realms/yourrealm/protocol/saml"/>

    <SingleLogoutService Binding="urn:oasis:names:tc:SAML:2.0:bindings:HTTP-Redirect"
                         Location="https://auth.kc.example.com/realms/yourrealm/protocol/saml/logout"/>

    <NameIDFormat>urn:oasis:names:tc:SAML:1.1:nameid-format:emailAddress</NameIDFormat>
  </IDPSSODescriptor>
</EntityDescriptor>
13. References & Public Documents
- Microsoft: Direct federation with SAML/WS‑Fed identity providers (https://learn.microsoft.com/en-us/entra/external-id/direct-federation)
- Microsoft: SAML authentication with Microsoft Entra ID (https://learn.microsoft.com/en-us/entra/architecture/auth-saml)
- Keycloak: Server Administration Guide — Identity brokering, mappers (https://www.keycloak.org/docs/latest/server_admin/index.html)
- Example blog: Azure AD Federation with Keycloak as SAML IdP (community walkthrough https://medium.com/@manoj.bhagat/microsoft-azure-ad-with-saml-integration-using-keycloak-as-an-identity-provider-8a2cf66e1c57)
(Use the official Microsoft Learn pages and Keycloak docs as the authoritative source.)
End of document.